8. Vehicle-mounted measuring device for gauge and twist under loaded condition
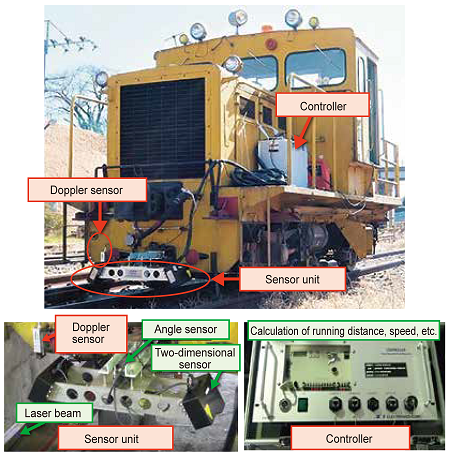
Because track inspection cars that measure track irregularity under loaded condition are expensive, hand-pushed measuring device is often used to control static track irregularity without applying the load of vehicles. However, such measuring device cannot measure the track irregularity under loaded condition affected by the wheel load and lateral force when the vehicle is running, so significant track irregularity may be overlooked. Therefore, we have developed a measuring device that can be mounted on maintenance cars and commercial vehicles to measure gauge and twist under loaded condition, which often cause derailment accidents. This device is about 1/10 the price of the previously developed on-board inspection device. This device (Fig. 1) consists of a sensor unit that measures track irregularity and a controller that processes the pulse signals from the Doppler sensor to obtain the running distance and speed. The sensor unit measures gauge, cross level, and twist by combining the output of the angle sensor with the relative irregularity of the rail measured by the two-dimensional sensor.
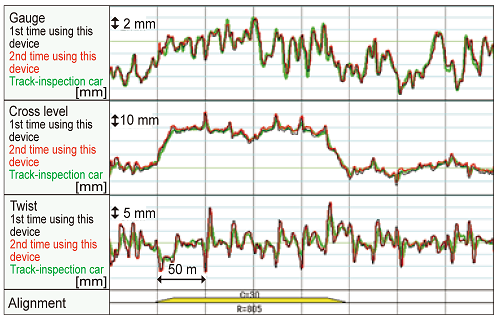
Through running tests, we have confirmed that the device satisfies the reproducibility required for a conventional track inspection car (error (=standard deviation of the difference between the two measurements): gauge: 0.5 mm, twist: 1.0 mm) and that the results are consistent with those measured by the track inspection car (Fig. 2).
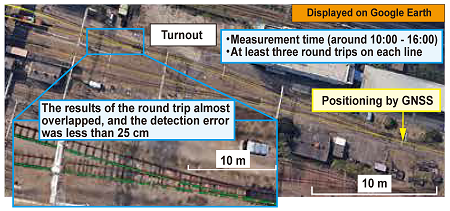
In addition, the detection error of measured position using GNSS positioning results is less than 25 cm (Fig. 3), so unmanned measurement is possible by utilizing the remote control function.
This device enables measurement of dynamic track gauge and twist on service lines and in depots, where track inspection cars have not been used before, thereby improving running safety.
Other Contents
- 1. Seismic reinforcement method for masonry embankment type train platforms
- 2. Anti-bridge-collapse device with seismic control function that can be installed in narrow spaces
- 3. High-accuracy estimation method for earthquake motion at bedrock during large-scale earthquake
- 4. Method to control snow accretion around a bogie using traveling wind
- 5. Method for detecting obstacle on railway tracks using an on-board monocular camera
- 6. Method to detect passengers approaching vehicles using vehicle side cameras
- 7. Brake control method to compensate for reduced braking force
- 8. Vehicle-mounted measuring device for gauge and twist under loaded condition


